

Cleaning your water tank seems simple enough: just drain, scrub, and refill, right? That’s wrong. This common misconception is a recipe for failure, or worse, serious contamination. Over time, your tank accumulates a nasty combination of sludge, sediment, algae, and potentially harmful bacteria that silently compromise your water quality. If left unaddressed, this build-up can affect the taste and odor of your water and pose significant health risks from waterborne pathogens like E. coli and Legionella.
A successful, safe, and effective DIY water tank cleaning project is 90% preparation. For homeowners ready to tackle this crucial maintenance task, having a definitive water tank cleaning supplies checklist is your most important first step. This guide is your actionable roadmap to getting the job done right.
We’ll walk you through everything you must have: the personal protective equipment (PPE) to ensure your safety, the essential cleaning tools for manual sludge removal and scrubbing, and the right way to properly disinfect your tank for guaranteed clean water. We’ll also detail the signs that a DIY job has become too complex and is best left to the professionals.

For a smooth start, download your FREE Materials & Supplies List PDF to obtain all the necessary tools, equipment, and safety gear required for your DIY water tank cleaning project.
Why Proper Water Tank Cleaning Supplies Are Important
Using the correct tools and agents for DIY water tank cleaning is critical for safeguarding your family’s health and preserving your home’s systems. Attempting the job with inadequate supplies creates a false sense of security and can lead to incomplete disinfection, re-contamination, or even damage to your tank.
Investing in the right tools is essential for three core reasons:
- Protect Family Health: An uncleaned tank is a breeding ground for pathogens. Food-grade disinfectants and proper tools are required to eradicate these harmful biofilms, preventing serious waterborne illnesses.
- Restore Water Quality: A thorough cleaning removes sediment, rust, and organic growth that impact your water’s taste, smell, and clarity. This restores fresh water and helps you spot the tell-tale signs of a dirty tank early.
- Preserve Your Tank & Appliances: Abrasive tools or harsh chemicals can damage your tank’s lining, promoting corrosion. The right supplies preserve its integrity and prevent sediment from clogging your plumbing and damaging appliances like water heaters or pumps.

“The biggest mistake we see is people thinking a simple drain-and-fill solves the problem. True cleaning requires specialized equipment to safely remove resistant biofilms and correctly disinfect without leaving harmful residue that can re-contaminate the water within days.” — KiTank Head of Operations
Safety Precautions & PPE for Water Tank Cleaning
Safety is the non-negotiable foundation of any effective water tank cleaning job. The extreme danger of confined spaces and corrosive agents makes the correct safety gear for cleaning water tanks your primary concern.
⚠️ Golden Rules for DIY Water Tank Cleaning
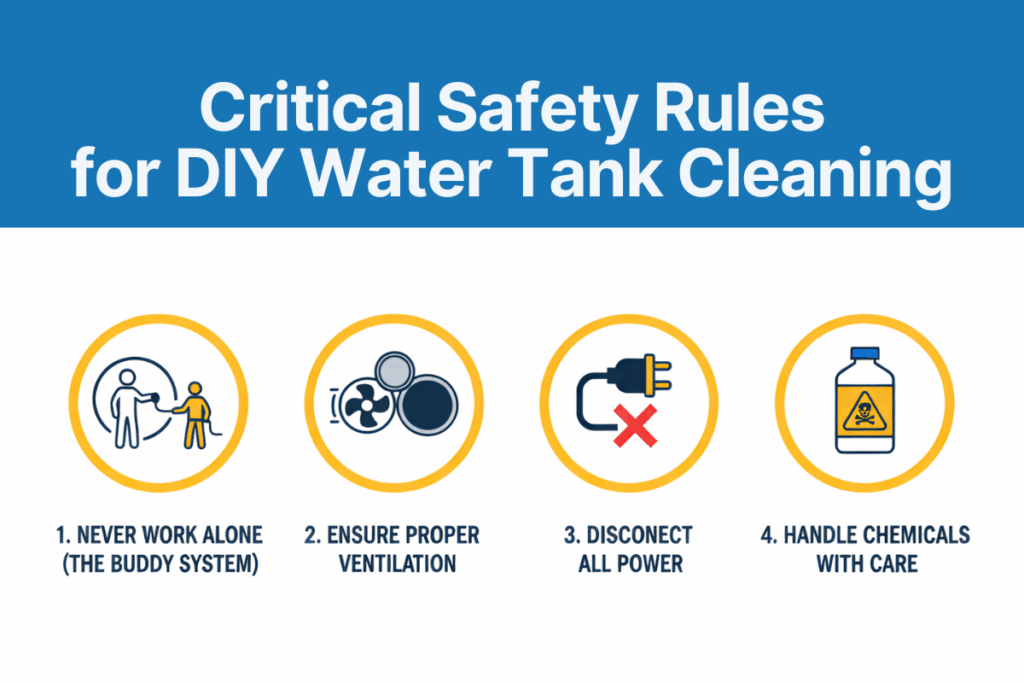
Cleaning a water storage tank yourself can be done safely, but it requires strict adherence to these safety protocols:
- Confined Space Danger: DO NOT ENTER A LARGE OR DEEP TANK. This is the single most important rule of confined space safety. Large water tanks are classified as confined spaces. They can lack oxygen, contain toxic fumes, or lead to suffocation, injury, or death. All cleaning and scrubbing should be done from outside. If internal entry is necessary, stop and call a professional water tank maintenance service.
- Handle Chemicals Safely: Never mix bleach with any other cleaning agents (like ammonia, acids, or detergents) as this creates highly toxic gases. Follow the manufacturer’s instructions precisely for dilution rates and ensure the area is well-ventilated.
- Disconnect All Electrical Power: Switch off the electrical power to any associated pump or electrical equipment to prevent accidental startup before you begin work.
- Always Use The Buddy System: Never work alone. Always have a “spotter” stationed outside the tank to monitor your safety and call for help in an emergency.
Mandatory Personal Protective Equipment (PPE)
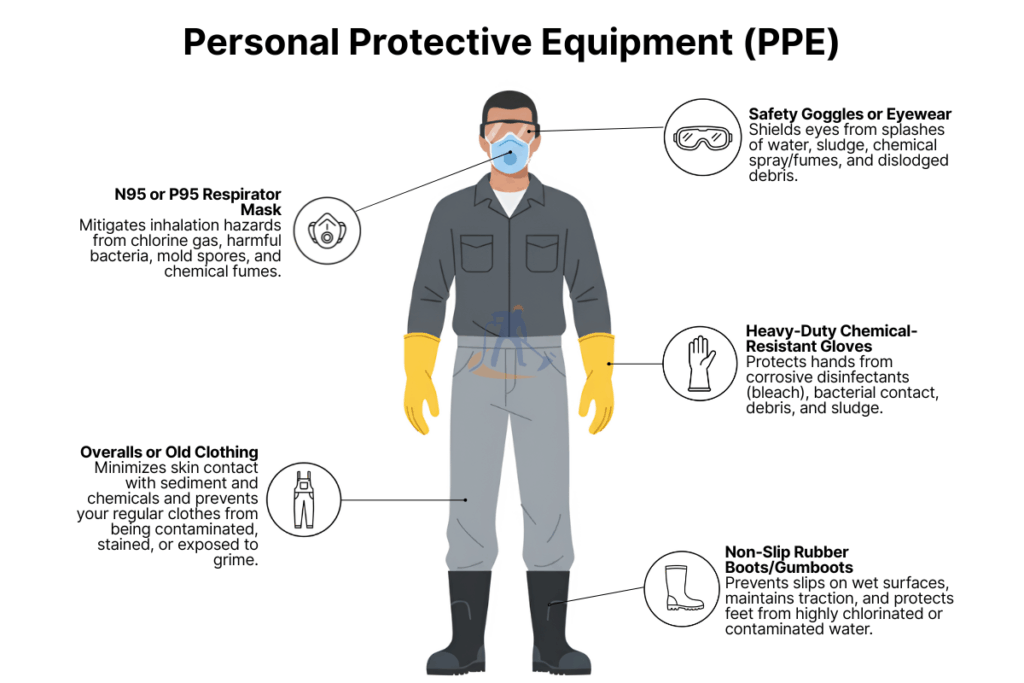
Your essential water tank cleaning PPE must be a full barrier to protect against splashes, chemicals, and debris hazardous materials and ensure safe disinfection.
| Item Category | Specific Requirement | Safety Rationale |
| Respiratory/Face | N95 Respirator or P95 Mask | Critical to filter corrosive fumes and aerosolized contaminants. |
| Eye Protection | Chemical Splash Goggles | Mandatory to shield eyes from chemical splashes and debris. |
| Hand Protection | Heavy-Duty, Chemical-Resistant Gloves | Essential barrier against disinfectants and bacterial sludge. |
| Foot Protection | Non-Slip Rubber Boots (Gumboots) | Prevents slips and protects feet from contaminated water. |
| Body Protection | Overalls or Dedicated Old Clothing | Minimizes skin contact with sediment and corrosive chemicals. |
Access Gear and Pre-Cleaning Considerations
Before you even start the cleaning process, some foundational steps and equipment are necessary to ensure a safe and efficient operation.
- Access & Visibility: Ensure you have a sturdy, secure ladder, a waterproof headlamp or flashlight, and an accessible First-Aid Kit.
- Use Appropriate Tools: Be mindful of your tank material. Use only non-metallic, non-abrasive tools (e.g., plastic brushes) on fiberglass, plastic, or coated tanks to prevent permanent damage and bacterial buildup.
- Communication & Disposal Logistics: Notify users that the water supply will be shut off and will be unsafe to drink until refilled and tested. Plan for safe wastewater disposal to protect plants and pets, especially when using chlorine.
Essential Manual DIY Cleaning Tools
Effective disinfection begins with a thorough physical cleaning. Before sanitizing, remove the debris, sludge, and biofilm that harbor bacteria. Use these simple tools to physically scrub the tank interior and remove sediment. This equipment list covers accessible tools suited for small-to-medium tanks where you can safely reach the tank’s interior.

Draining and Sludge Removal Tools
- Submersible Pump: The most efficient way to drain the bulk of the water. Renting a pump is often the most cost-effective option.
- Wet/Dry Vacuum: Essential for removing the last few inches of water and the thick sludge a pump cannot handle.
- Buckets and Scoops: Manual workhorses for removing stubborn, thick sludge.
- Adjustable Wrench: Needed to securely turn off the main water inlet and outlet valves.
Equipment for Scrubbing and Rinsing
- Long-Handled, Non-Metallic Brush: Your primary tool for scrubbing walls and floors. A non-metallic head is mandatory to prevent scratching plastic, fiberglass, or coated steel.
- Smaller Handheld Brushes: Use these for detailed work around fittings, pipes, and corners.
- Plastic Scraper: Ideal for carefully removing hardened mineral deposits.
- Hose with High-Pressure Nozzle or a Low-Pressure Washer: A strong spray is necessary to rinse down walls and flush all loosened debris towards the drain.
Never use a high-pressure washer inside a plastic or fiberglass tank. The intense water jet can easily gouge the material by creating microscopic scratches that harbor bacteria and algae. If you must use one, set it to the lowest pressure setting and use a wide fan-spray nozzle.
Disinfectant Mixing and Measuring Tools
Precision is key for safe disinfection. Always use:
- Calibrated Measuring Jugs: Use these to accurately measure disinfectant to ensure the correct concentration.
- Clean, Designated Bucket: Use a separate bucket solely for mixing the disinfectant with water.
Pro Tip: Rent, Don’t Buy Advanced Mechanized Equipment
For many homeowners, purchasing expensive equipment and machinery for a single job isn’t practical. Renting is a smart financial choice.
| Item | Purchase Cost (Est.) | Daily Rental Cost (Est.) | Recommendation |
| Submersible Pump | KSh 5,000 – KSh 12,000 | KSh 500 – KSh 1,000 | Rent unless you have other regular uses. |
| Wet/Dry Vacuum | KSh 8,000 – KSh 18,000 | KSh 1,000 – KSh 2,500 | Rent for large tanks; consider buying for general home use. |
| Pressure Washer | KSh 10,000 – KSh 30,000 | KSh 1,500 – KSh 3,000 | Definitely Rent. Professional models are superior and safer. |
Cleaning and Disinfection Chemical Supplies
Removing visible dirt is just the first step. To make your water safe, you must disinfect the tank to kill harmful bacteria, viruses, and algae.
Cleaning removes visible dirt, while disinfecting kills unseen microorganisms like bacteria and viruses to make water safe. Since disinfectants are less effective on dirty surfaces, both cleaning and disinfecting are essential steps.
Approved Cleaning Solutions for Physical Scrubbing
For the initial scrubbing, choose mild, food-grade agents that rinse away completely. Avoid harsh industrial cleaners or scented soaps, which can leave harmful residues.
- Mild Detergent: A small amount of unscented, biodegradable soap helps lift grime.
- Vinegar (Acetic Acid): An excellent eco-friendly water tank cleaner for removing grime and dissolving hard water scale (limescale). Use one part vinegar with three parts water for descaling.
- Baking Soda (Sodium Bicarbonate): A paste of baking soda and water acts as a mild abrasive, perfect for scrubbing tough spots without scratching the tank’s surface.
Remember: These agents clean, but they do not disinfect.
Disinfecting Agents for Pathogen Elimination
After scrubbing and rinsing, you must use a certified disinfectant to make the water safe. In Kenya, look for KEBS-approved products.
- Unscented Household Bleach (Sodium Hypochlorite): The most effective, affordable, and widely approved disinfectant for potable water systems. Use only plain, unscented bleach with a concentration of 5% to 8%.
- Alternative Disinfectants: Food-grade hydrogen peroxide or specialized commercial sterilizing tablets are also effective options for disinfection. Always follow the manufacturer’s instructions precisely.

While chemical dosing is common, it’s helpful to compare all modern water disinfection methods, including chlorine, UV, and ozone, to find the right one for your system.
Application and Contact Time
Precision is essential for safety. The most reliable water disinfection method is shock chlorination, targeting a concentration of 50 parts per million (ppm).
Shock Chlorination Dosage Table (50 ppm Target)
| Tank Size (Litres) | Required 5-8% Unscented Bleach |
| 1,000 L | 1 Litre |
| 2,500 L | 2.5 Litres |
| 5,000 L | 5 Litres |
| 10,000 L | 10 Litres |
After adding the bleach, fill the tank completely and let it sit for at least 30 minutes (or longer, up to several hours) This critical contact time ensures the disinfectant works. Afterwards, drain and rinse the tank until the chlorine smell is gone.
“Incorrect chemical dilution for disinfection can damage your water tank, fail to kill pathogens, or create harmful toxins in your drinking water. This is why it is critical to follow established protocols for safe and precise dilution, as water disinfection is a science that requires precision rather than guesswork.” — Water Safety Specialist
Download Your Free DIY Water Tank Cleaning Supplies Checklist PDF
Ready to tackle the job? To ensure you do not miss a single essential item, we have consolidated every tool, safety gear (PPE), and cleaning agent from this guide into a single, comprehensive printable checklist.
This is more than a shopping list; it’s your complete project plan. It includes category-by-category breakdowns, estimated 2025 KSh costs, and critical safety reminders for a safe, efficient, and successful job.
Get Your Free Water Tank Cleaning Materials List
Don’t waste time running to the store because you forgot essential supply for your water tank cleaning. Download our FREE, printable PDF Checklist for all the tools, safety gear, and disinfectants you need for a safe and effective clean. Keep it handy for your next maintenance day!
How to Clean Your Water Tank at Home Safely
Here’s a quick guide to DIY cleaning your water storage tank. This process outlines the use of your supplies for thorough cleaning, sludge removal, and safe disinfection of small, accessible tanks that don’t require internal entry.
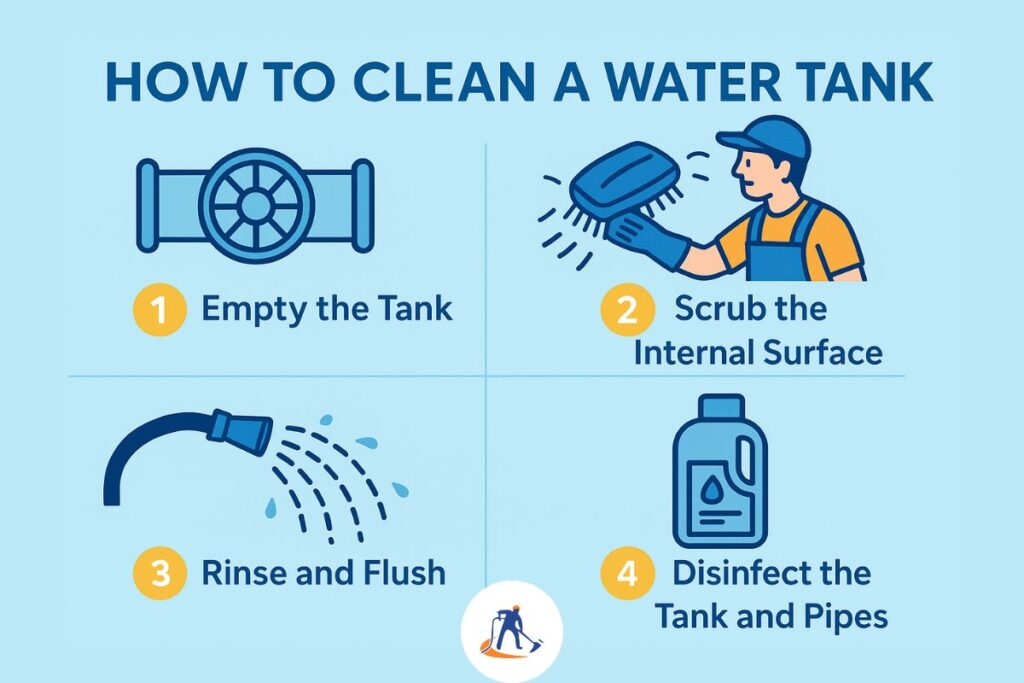
Step-by-Step DIY Water Tank Cleaning Process
- Preparation: Turn off the water inlet and pumps. Put on your protective gear including gloves, eye protection, and a mask.
- Drain & De-sludge: Empty the tank. From outside the tank, use the wet/dry vac or long-handled scoop and bucket to remove all sediment and sludge.
- Scrub the Interior: Using a long-handled brush and your chosen cleaner (e.g., baking soda paste), scrub all accessible interior surfaces from the top opening.
- First Rinse: Use the high-pressure hose to thoroughly rinse all surfaces, washing all loosened grime and cleaning agents down to the drain.
- Disinfect the Surfaces: Mix a disinfectant solution (e.g., 1 part bleach to 10 parts water for a strong surface solution). Apply this solution to all interior surfaces using the brush or a sprayer. Let the solution sit for at least 30 minutes (or longer, up to several hours, depending on the severity and method) to ensure germ kill. Run all taps in the house until you smell chlorine to disinfect the pipes as well.
- Final Drain & Rinse: Drain all the chlorinated water completely. Rinse the tank at least twice more with clean water until no chlorine odor is left.
- Refill and Test: Refill the tank with fresh water. Use chlorine test strips to ensure the level is safe.
For a complete walkthrough on how to use these tools effectively, be sure to check out our full step-by-step guide to cleaning your water tank at home.
Post-Cleaning Verification, Repair Supplies, and Disposal Procedures
These crucial steps ensure your tank is not just clean but structurally sound and verifiably safe for long-term use.
Water Quality Testing
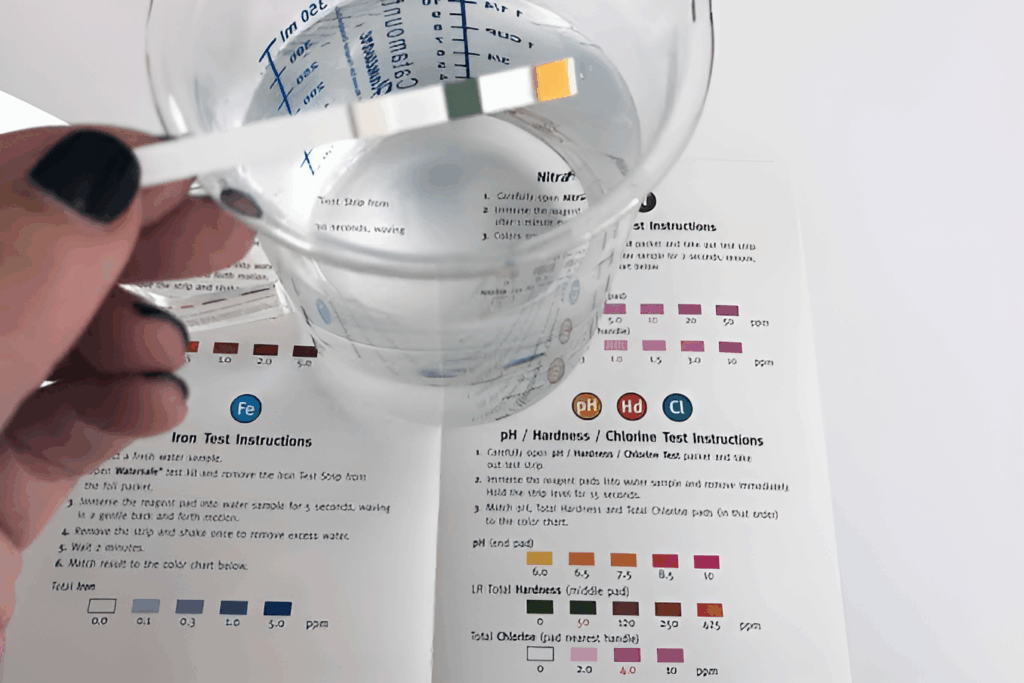
After cleaning and rinsing, especially when using bleach, it is important to test the water to ensure no chemicals remain.
- Chlorine Test: Use chlorine test strips on the refilled water. Residual chlorine levels up to 4 ppm, are considered safe for drinking water. A near-zero reading is ideal.
- Comprehensive Testing (Optional): For total confidence, use a multi-parameter home water test kit (KSh 500–1,500) to check for bacteria (like E. coli), pH balance (ideally 6.5–8.5), and other contaminants. If you removed significant rust, use iron-specific test strips.
Minor Repair and Documentation Supplies
- Repair Supplies: Have a tank patch kit and food-grade silicone sealant ready for immediate small crack repair. Replace any worn gaskets or seals to prevent future water contamination.
- Documentation: Maintain a cleaning logbook. Record the date, agents used, repairs made, and test results. This is vital for tracking tank condition and scheduling the next cleaning.
Responsible Wastewater and Sludge Disposal
Proper disposal protects your property and the local environment. Highly chlorinated water is an environmental hazard. Never drain it directly into a garden, waterway, or storm drain.
- Best Practice (Neutralization): The most responsible method is to neutralize the chlorine with Sodium Thiosulfate (Na2S2O3). This converts chlorine into a harmless salt.
- Alternative Methods: If neutralization isn’t feasible, drain the water slowly into a municipal sanitary sewer or a large, barren gravel area away from gardens and wells.
- Sludge Disposal: Physical sludge should be double-bagged and disposed of with regular household garbage.

“We adhere to strict NEMA guidelines for waste disposal. For a DIY cleaner, dumping chemicals is an environmental risk; for us, it’s a non-negotiable professional responsibility.” — KiTank Head of Operations
Sourcing Supplies & The True Cost of a DIY Clean in Kenya
Sourcing your water tank cleaning supplies in Kenya is straightforward.
Where to Buy Water Tank Cleaning Supplies in Kenya
You can find all necessary water tank cleaning equipment, materials, and tools at local and online retailers. To save time, source similar items from one type of store:
- Hardware Stores: Excellent sources for most items like brushes, hoses, buckets, PPE, and ladders.
- Supermarkets: The most convenient source for cleaning agents like unscented household bleach, white vinegar, and baking soda.
- Specialized Chemical Suppliers: Buy KEBS-certified chlorine products (Sodium Hypochlorite) to ensure the disinfectant is pure and safe for potable water systems.
Estimated DIY Budget for Basic Water Tank Cleaning Supplies
The following table provides an estimated cost for the essential equipment and materials required for a safe DIY cleaning job in Kenya, based on current 2025 retail prices.
| Supply Item | Estimated Cost (KSH) | Notes |
| I. Safety Gear (PPE) | ||
| 1. Chemical-Resistant Gloves | KSH 350 – KSH 550 | Initial/Reusable |
| 2. Splash-proof Goggles (or eyewear) | KSH 250 – KSH 500 | Initial/Reusable |
| 3. N95/FFP2 Mask | KSH 60 – KSH 150 | Recurrent/Consumable |
| II. Cleaning Tools & Equipment | ||
| 4. Long-handled Scrub non-metallic Brush | KSH 400 – KSH 800 | Initial/Reusable |
| 5. Bucket (10–20 L) | KSH 350 – KSH 700 | Initial/Reusable |
| 6. Basic High-Pressure Hose Nozzle (or Water Jet) | KSH 1,000 – KSH 1,500 | Initial/Reusable |
| III. Cleaning Agents & Disinfectants | ||
| 7. Unscented Bleach (5L) | KSH 1,000 – KSH 1,800 | Recurrent/Consumable |
| 8. White Vinegar (5L) | KSH 1,000 – KSH 1,300 | Recurrent/Consumable |
| 9. Baking Soda (1kg) | KSH 250 – KSH 500 | Recurrent/Consumable |
| 10. Sodium Thiosulphate (Dechlorinator, 500g) (Optional) | KSH 300 – KSH 500 | Recurrent/Consumable |
| IV. Testing & Verification | ||
| 10. Chlorine Test Strips/Kit | KSH 500 – KSH 1,200 | Recurrent/Consumable |
| TOTAL ESTIMATED INITIAL INVESTMENT | KSH 5,510 – KSH 9,500 | Cost to fully equip a first-time DIY operation. |
| ESTIMATED RECURRENT COST | KSH 3,110 – KSH 5,450 | Cost for subsequent cleanings (consumables only). |
Pro Tip: Consider purchasing a pre-made water tank cleaning kit. While the upfront cost may be higher, a kit ensures your tools and safety gear are compatible and saves you the time and hassle of visiting multiple stores.
DIY vs. Professional: A Breakdown of Cost, Effort, and Safety
Now that you understand the costs and effort involved, you can make an informed choice. Deciding between a professional cleaning and a DIY approach involves a trade-off between initial savings and guaranteed safety and effectiveness.
The core difference lies in the method: DIY relies on manual scrubbing, while professionals use mechanized, high-power equipment for a certified clean.
| Feature | DIY Approach (Manual Tools) | KiTank Professional Service (Mechanized Cleaning) |
| Time Investment | 4–6+ Hours. A demanding, time-consuming job. | 1–2 Hours. Our technicians use specialized equipment for a fast, thorough clean. |
| Cleaning Effectiveness | Inconsistent. Manual scrubbing fails to remove stubborn biofilm. | Excellent. High-pressure water jets scour the tank for a certified clean. |
| Safety & Risk | High. You assume all risks: chemical exposure and physical injury. | Zero Risk to You. Our trained, insured experts handle all safety protocols. |
| True Cost | KSh 5,510 – KSh 9,500+ for initial equipment, excluding your time. | A quote-based fee that’s often more affordable than buying DIY equipment. |
| Guaranteed Result | Uncertain. Results vary with skill and effort. | Guaranteed. A certified clean that meets public health standards. |
💡 Financial Insight: A comprehensive DIY cleaning requires an initial investment of KSh 5,510 to KSh 9,500 for essential supplies. Compare this the cost of a single professional water tank cleaning, which typically ranges from KSh 3,000 to KSh 8,000 for a standard residential tank.
The upfront costs for DIY cleaning equipment and safety gear, therefore, meet or even exceed the price of hiring a professional water tank cleaning service. When you factor in the responsibility of safe chemical handling and the assurance of a guaranteed result, a professional service is often the more reliable and affordable choice, ensuring safety and peace of mind.
When to Skip the DIY and Call the Professionals at KiTank Cleaning

While DIY cleaning is viable for routine tank maintenance, a responsible owner is aware of its limitations. For your safety and the health of your water supply, hire a professional if you encounter any of the following signs or situations:
- Confined Space Entry: If the tank requires physical entry, it is a high-risk environment. Professionals have the certified training and breathing apparatus to manage this safely.
- Severe Contamination: Evidence of pests, thick sludge, or water quality issues (foul smell, bad taste) requiring professional diagnosis.
- Structural Damage: Major cracks, corrosion, or persistent leaks are problems cleaning cannot solve.
- Large or Inaccessible Tanks: Tanks over 5,000 litres, or those that are underground, require industrial equipment like sludge vacuums and high-pressure rotary cleaners for an effective clean.
The cost of a professional service is an investment in your family’s health and your peace of mind. KiTank Cleaning provides more than a simple wash; we inspect for structural issues, offer preventative care, and provide complete convenience with scheduled maintenance plans for pristine water year-round.
“Our clients value that we don’t just clean; we inspect for underlying issues like cracks or corrosion. This preventative approach saves them money on future repairs and provides a certified result that manual scrubbing cannot match.” — KiTank Customer Service Manager
Maintenance Tips to Keep Your Tank Clean Longer
Proactive water tank maintenance is key to long-term water safety. These routine checks will reduce the frequency and intensity of future cleaning jobs:
- Secure and Seal Your Tank Lid: Ensure the lid is opaque and lockable to block sunlight (which fuels algae growth) and keep pests out.
- Inlet Pre-Filters: Install a coarse strainer, a mesh filter (approx. Ksh 1,000–3,000), or a first-flush diverter to prevent leaves and large sediment from entering.
- Avoid Water Stagnation: Regularly cycle the water (use and refill) to prevent stagnation, which is a prime breeding ground for bacteria.
- Conduct Monthly Visual Inspection: Use a flashlight to check for early signs of sediment or slime.
- Schedule a Professional Clean: Book a professional deep clean every 6-12 months to remove stubborn, invisible biofilm.
Conclusion: Get Prepared, or Get Professional Peace of Mind
A safe and successful DIY water tank cleaning is achievable, but it hinges on meticulous preparation and the correct water tank cleaning supplies. This guide provides a comprehensive 7-step process and equipment list for cleaning your water tank at home, from critical PPE to non-metallic cleaning tools and certified disinfection chemicals.
You now have two clear options:
- Use this expert guide and our free printable checklist to confidently tackle the job yourself, provided your tank is small and easily accessible.
- Opt for guaranteed results and zero risk by letting the experts handle it.
If sourcing supplies and spending a weekend wrestling with sludge and hazardous fumes seems daunting, KiTank Cleaning offers a professional alternative. Our trained, insured technicians use industrial-grade equipment and KEBS-certified protocols to ensure your tank is spotless and your water meets national health standards, removing all hassle and risk from your shoulders.
Ready for Water You Can Trust? Schedule your professional water tank cleaning with KiTank Cleaning Services today for guaranteed, risk-free results.
Call or WhatsApp us at 0729 735 245 for a free consultation. Or fill out our online form to Book Your Tank Cleaning Service today!
Disclaimer: This guide is for informational purposes only. Undertaking a DIY water tank cleaning involves risks, including working in a confined space and handling chemicals. KiTank Cleaning is not liable for any injury or damage resulting from these activities.
