
Clean water is essential for every household and business in Kenya, serving everything from drinking and cooking to bathing and washing. Often overlooked, your water tank plays a critical role in maintaining this vital supply. But have you ever wondered how to clean your water tank properly to ensure the water you rely on is truly safe and healthy?
Many homeowners and facility managers ponder this question, seeking to keep their water storage pristine. While there are certainly steps you can take yourself to maintain your tank, achieving a truly “proper” and safe clean requires specific knowledge, specialized tools, and adherence to safety protocols. In Kenya, where waterborne diseases like cholera and typhoid can be a concern, regular tank cleaning isn’t just a maintenance task but a vital health measure.
This comprehensive guide will walk you through the basic water tank cleaning process, from preparation to disinfection. We’ll also compare DIY cleaning with professional services, showing why expert help often ensures better health and safety for your household or business.
Pre-Cleaning Checklist – Safety & Preparation First!
DIY water tank cleaning demands careful preparation and a steadfast commitment to safety. Before opening the tank, prepare diligently and prioritize safety. Neglecting these precautions can lead to accidents or ineffective cleaning. Clean safely and responsibly; this crucial aspect is often overlooked.
Tools and Supplies Needed for DIY Water Tank Cleaning

To clean your water tank effectively, gather these items:
- Personal Protective Equipment (PPE):
- Waterproof gloves (heavy-duty rubber gloves are ideal)
- Gumboots (clean and disinfected if you need to step inside larger tanks)
- Protective eyewear (goggles)
- Face mask (N95 or P95 respirator, especially if using strong cleaning agents or if the tank is very dirty)
- Overalls or old clothing
- Cleaning Tools:
- A sturdy ladder to safely access the tank.
- A submersible pump (if your tank doesn’t have a drain valve at the very bottom or if you want to speed up draining).
- A high-pressure hose or jet washer (use with caution on plastic/fiberglass tanks).
- Scrub brushes with stiff (non-metallic) bristles and long handles. Avoid wire brushes on plastic or fiberglass tanks as they can damage the surface.
- Buckets and a scoop for removing sludge and residual water.
- Clean, lint-free cloths or sponges.
- Cleaning & Disinfecting Agents:
- Use Mild, unscented household bleach (sodium hypochlorite 5-8%) for cleaning and disinfection. Ensure it’s suitable for potable water systems. Alternatively, other approved water tank sterilizing solutions can be used.
- Non-toxic cleaning alternatives like vinegar or baking soda (for less severe cleaning needs or if preferred, though bleach is more effective for disinfection).
- Sodium thiosulphate (optional, for neutralizing chlorine after disinfection if rapid de-chlorination is needed).
- Lighting: A waterproof flashlight or portable work light if your tank interior is dark.
The risks of slipping, contact with various forms of debris, and potential chemical exposure are significant, making proper personal protective equipment (PPE) absolutely essential.
Notify Everyone & Secure Your Water Supply
An often-missed but crucial step is informing everyone who uses the water supply that it will be temporarily shut off. Whether it’s your household members, staff, or tenants, clear communication prevents inconvenience and ensures no one attempts to use the water during the cleaning process.
Furthermore, it’s wise to store an adequate amount of potable water for essential use during the downtime, covering needs like drinking, basic hygiene, and cooking. This ensures continuity of crucial water access even as your tank is being cleaned.
Assess Your Tank & Surroundings
Before beginning the proper water tank cleaning procedure, take time to thoroughly assess your water tank and its immediate environment. A quick inspection can save you a lot of trouble.
- Tank Type & Access: Identify the type of water tank you have (plastic, concrete, GRP, etc.), as this influences cleaning methods. Check access points; is the manhole large enough for safe entry if needed? (Internal entry is often discouraged for DIY.)
- Clear the Area: Clear obstructions, debris, or potential hazards around the tank for working space and tool placement.
- Initial Inspection: Look for visible tank damage to the tank, such as cracks or excessive algae growth, as these might require professional attention.
- Electrical Safety: If your tank has an electric pump, TURN OFF THE POWER SUPPLY at the main switch and unplug it to prevent electrical hazards.
How to Clean Your Water Tank: Step-by-Step DIY Guide
With safety precautions taken and workspace prepared, begin the DIY water tank cleaning.
These systematic steps ensure thorough cleaning and safe tank hygiene. This section breaks down the process into manageable stages, from draining the tank to the final sanitization.
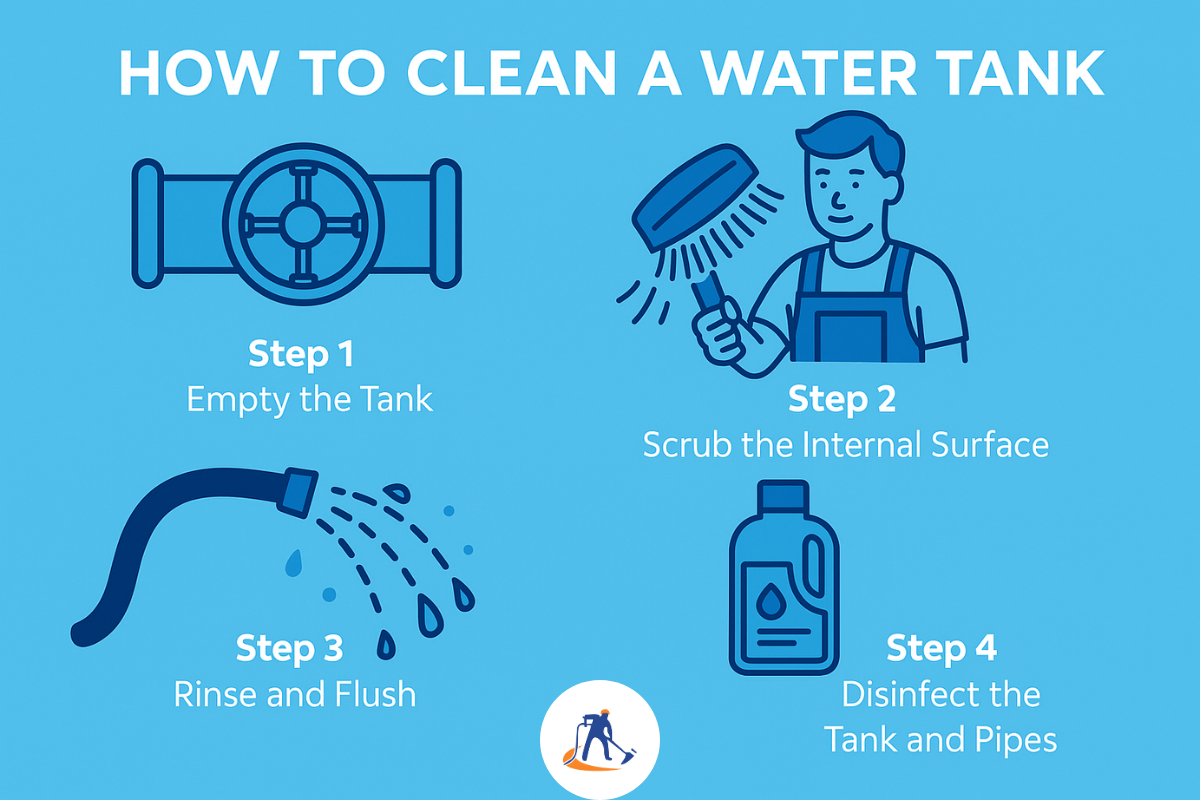
Step 1: Drain the Tank (Almost Completely)
The initial phase of any water tank cleaning procedure involves draining the tank.
- Close the main inlet valve that supplies water to the tank.
- Open the outlet valve or tap and drain all water. Direct this water to your garden (if free of harmful chemicals) or for non-potable uses like washing floors or cars to conserve water.
- If the outlet doesn’t drain the tank completely, use a siphon hose, submersible pump, or buckets to remove the remaining water.
- Leave about 6-12 inches (15-30 cm) of water at the bottom to help dislodge sediment during scrubbing.
Step 2: Clean the Tank Interior
- Remove Sludge and Debris:
- With the tank mostly empty, use a bucket or wet/dry vacuum to remove sediment, sludge, leaves, and debris from the bottom.
- Scrub the Interior Surfaces Thoroughly:
- Initial Scrub: Use the long-handled brush with remaining water (or fresh bucket water) to scrub inner walls, floor, and corners, dislodging dirt, algae, and slime.
- Apply Cleaning Solution:
- For general cleaning: Mix a mild, unscented detergent with clean water in a bucket.
- For tougher cleaning (or if bleach will be used for disinfection later): You can make a cleaning paste with baking soda and water, or use a diluted vinegar solution (1 part vinegar to 3 parts water).
- Apply your chosen solution to all interior surfaces using the brush or scrubbing pads. Focus on corners, joints, and areas with visible buildup.
- Avoid using metallic brushes on plastic tanks as they can scratch the surface, creating areas where bacteria can lodge.
- Let it Sit (if using vinegar or baking soda): Allow the solution 30 minutes to an hour to break down grime. If using only detergent, proceed sooner.
- High-Pressure Wash (Optional): A pressure washer effectively removes stubborn dirt and algae post-scrubbing. Use cautiously on older or fragile tanks.
- Rinse Thoroughly:
- Using a clean water source (hose or buckets), thoroughly rinse all interior surfaces of the tank to remove the cleaning solution and dislodged debris.
- Drain or vacuum out the rinse water completely. Repeat the rinsing process two to three times, or until the water runs clear and there’s no trace of the cleaning agent.
Step 3: Disinfection (Crucial Step for Potable Water Tanks)
Here’s how to disinfect your water tank at home:
- Prepare Disinfectant Solution (Using Bleach):
- Safety precautions for bleach: Ensure good ventilation when using bleach if you are working inside or near the tank opening. Wear your PPE.
- The general recommendation for disinfecting a water tank is to use a solution of approximately 50 parts per million (ppm) of chlorine. A common household bleach (5-8% sodium hypochlorite) can be used.
- Dosage Guide (approx.): Add about 30-50 ml of household bleach per 1000 liters of water capacity of your tank to achieve roughly 50 ppm. For smaller tanks, you might use a ratio like 1 part unscented bleach to 100 parts water for the disinfection solution if you are filling the tank partially for this step. Alternatively, for scrubbing surfaces with a disinfecting solution, a common dilution is 1 part bleach to 10 parts water, but ensure thorough rinsing afterwards.
- Important: Check bleach concentration and adjust. If unsure, slightly under-dose and increase contact time rather than overdose.
- Apply Disinfectant:
- Method 1 (Surface Disinfection): For small tanks or if not filling, use a brush or sprayer to apply a 1:10 bleach/water solution to all interior surfaces of the tank, ensuring full coverage.
- Method 2 (Full Tank Disinfection – More Thorough): After cleaning and rinsing, close the outlet. Fill the tank with clean water, adding calculated bleach during filling for proper mixing. Fill the tank completely.
- Allow Contact Time:
- Let chlorinated water (or surface bleach solution) sit for at least 4-6 hours. For heavily contaminated tanks or lower chlorine concentrations, extend contact time (up to 12-24 hours if feasible). Cover the tank during this period to prevent recontamination.
- If you used Method 2 (Full Tank Disinfection), it’s also a good idea to open each tap connected to the tank one by one until you can smell chlorine. This disinfects the pipes as well. Then close the taps and let the system sit for the contact period.
Step 4: Final Rinsing and Refilling
- Drain the Disinfectant Solution:
- Open the outlet valve and completely drain the chlorinated water. Dispose of this chlorinated water responsibly, in adherence to environmental and water regulations in Kenya. Avoid draining it directly into gardens or water bodies where it could harm plants or aquatic life. If possible, drain it into a wastewater system or a soak pit away from sensitive areas.
- Thorough Final Rinse:
- Rinse the tank interior thoroughly with fresh, clean water at least two to three times to remove all traces of chlorine. A pressure washer is again helpful here.
- Ensure all bleach odor is gone. You can test the water from the outlet – it should not smell of chlorine.
- If you need to neutralize any remaining chlorine quickly, you can add a small amount of sodium thiosulphate during the final rinse (follow product instructions), though thorough rinsing with fresh water is usually sufficient.
- Inspect the Tank: Before refilling, do a final visual inspection for any missed spots, damage, or remaining debris. Ensure the lid is clean.
- Refill the Tank: Close the outlet valve. Open the main inlet valve and refill with fresh, clean water. Secure the tank lid properly to prevent contaminants.
- Reconnect Power (if applicable): Once the tank is refilled and all connections are secure, you can turn the power back on to the pump.
Post-Cleaning:
- Record the Cleaning Date: Keep a record of when the tank was cleaned to schedule the next cleaning.
- Water Quality Check (Optional but Recommended): For peace of mind, especially if there were previous contamination issues, you can get your water tested by a recognized laboratory.
Why a “Proper” Clean Means Calling in the Professionals
While these DIY steps improve basic tank hygiene, professional cleaning often ensures a safer, more thorough result. A significant gap exists between a surface clean and a deep, hygienic one.
Beyond the Surface: What DIY Misses
A DIY approach, however diligent, has inherent limitations:
- Incomplete Disinfection: Correct disinfectant concentration, contact time, and full coverage are hard to achieve without specialized equipment, risking survival of harmful bacteria or viruses.
- Hidden Contaminants & Biofilms: Tough biofilms—slimy microorganism colonies—resist manual scrubbing and mild detergents.
- Inaccessible Areas: Some tank parts, especially in larger or complex tanks, are difficult or impossible to reach for thorough hand cleaning.
- Lack of Specialized Equipment: Without high-pressure jets, industrial vacuums, and appropriate testing kits, the clean is often superficial.
- Risk Assessment: Professionals assess risks of confined space entry, structural integrity, and cleaning agent choice for different tank materials.
The Professional Advantage: Safety, Thoroughness & Guaranteed Results

The benefits of professional water tank cleaning surpass DIY methods, delivering a safer and more thorough result.
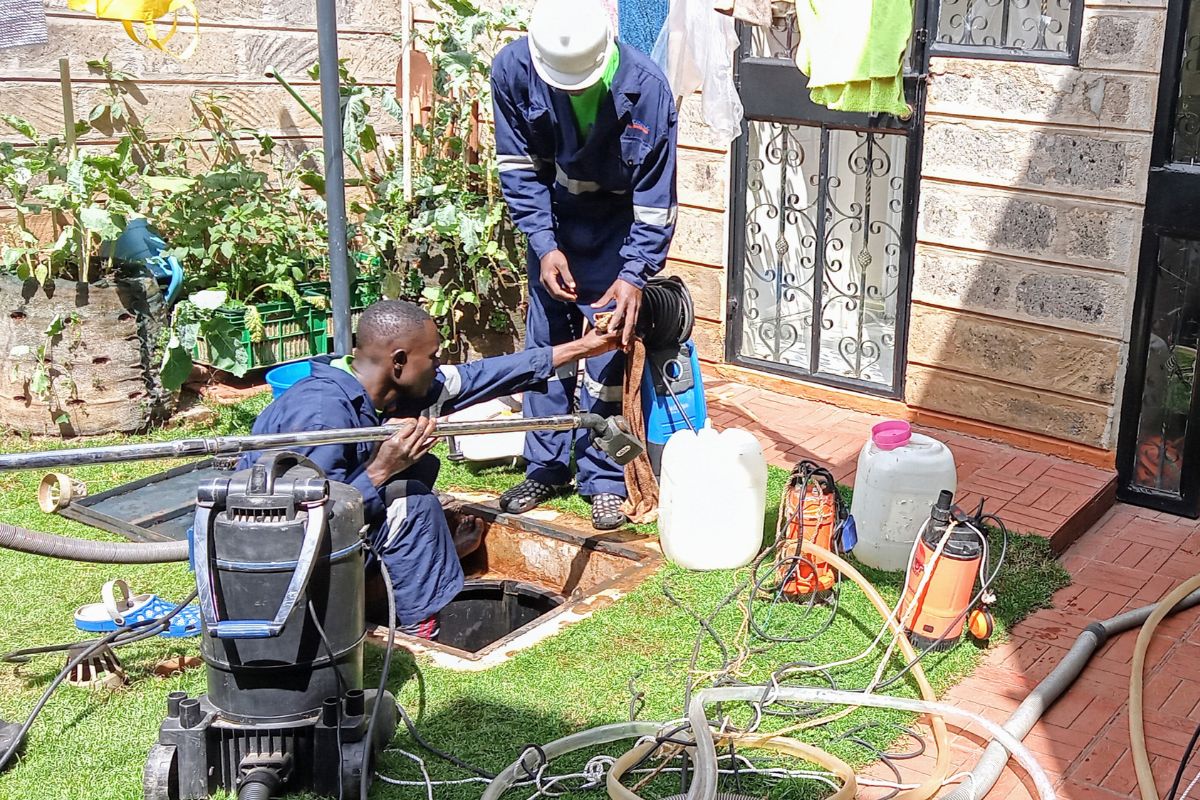
KiTank Cleaning Services, offers this reliable and comprehensive solution through:
- Expertise & Safety: Our trained technicians understand confined space entry, safe chemical handling, and working at heights—risks often unknown to homeowners. Equipped with proper Personal Protective Equipment (PPE), they protect themselves and your property.
- Specialized Equipment: We use modern, specialized tools, not just a bucket and brush. High-pressure jet washers remove stubborn grime, industrial sludge pumps efficiently clear waste, advanced scrubbing tools suit various tank materials, and ventilation systems ensure a safe environment.
- Effective Disinfection: Essential for safe water, our team uses approved, potent, food-grade disinfectants—more effective than household bleach. Applied at precise concentrations with specialized sprayers for maximum bacterial kill, they are thoroughly rinsed to eliminate residue, ensuring your water is safe to drink.
- Water Quality Testing: Like many reputable Kenyan services, we offer post-cleaning water quality testing. This provides scientific proof of a bacteria-free tank and safe water, offering peace of mind and defining a “proper” clean.
- Adherence to Safety Standards: Safety is paramount at KiTank Cleaning Services. We strictly follow relevant safety protocols, including NEMA and KEBS guidelines, using appropriate PPE to protect our technicians and your water system.
- Efficiency & Convenience: Hiring KiTank Cleaning Services saves you time, effort, and mess. We work efficiently to minimize disruption to your water supply.
As one satisfied Nairobi client said, “After KiTank Cleaning Services cleaned our hotel’s tank, our water quality improved, and guests noticed the difference!”
When to Clean & When to Call Us (Signs Your Tank Needs Attention)

Regular cleaning is vital for maintaining water quality. But how often should you clean your water tank?
For most residential and commercial tanks in Kenya, professional cleaning is generally recommended at least once every 6 to 12 months. However, the ideal frequency for cleaning your water tank may vary depending on factors like water source quality, usage, tank condition, and local environmental conditions. In some cases, especially with concrete tanks, more frequent cleaning (every 6 months) might be necessary.
💡Pro Tip: Regular water tank maintenance prevents sediment and bacteria buildup, ensuring safe drinking water.
Warning Signs Your Tank Needs Cleaning (Indications of a Dirty Water Tank)
However, beyond scheduled cleaning, certain warning signs indicate your tank needs immediate attention:
- Discolored Water: Is your tap water appearing cloudy, brownish, or yellowish?
- Foul Smell or Taste: Does your water have an earthy, metallic, or otherwise unpleasant odor or taste?
- Reduced Water Pressure: Significant sediment buildup can sometimes affect outflow and reduce pressure.
- Visible Sludge or Algae: If you can see sediment, slime, or algae in the tank through an inspection hatch or in your water.
- Frequent Unexplained Illnesses: While many factors can cause stomach upsets or skin irritations, contaminated water is a known culprit. If you notice a pattern, get your tank checked.
- After Flooding or Repairs: If the tank has been potentially contaminated due to floods, nearby construction, or repairs to the water system.
If you observe any of these signs of a dirty water tank, seek professional help.
Don’t Guess, Get it Right: Your Water Tank Deserves a Professional Clean!
A clean water tank is a homeowner’s responsibility. Understanding proper cleaning, preparation, safety, cleaning, and disinfection, contributes to your household’s or business’s well-being. Regular cleaning prevents waterborne diseases, improves water quality, prolongs plumbing life, and brings peace of mind.
While DIY maintenance is commendable, understand its limits for critical hygiene. Basic cleaning helps, but true water safety and thorough contaminant removal require professional expertise and equipment. Your water supply deserves the same priority as other health and safety aspects.
Don’t leave your water quality to chance. For a comprehensive, safe, and effective clean, trust KiTank Cleaning Services. We offer top-tier water tank cleaning services in Nairobi and major Kenyan towns for homes, estates, businesses, and institutions. Book your professional water tank cleaning with us today for peace of mind and ensure clean, safe, healthy water!
Call to get a FREE water tank cleaning quote and experience the difference of a truly professional clean!
